Table of Contents
ToggleWalk to the end of most hallways and you’ll find a blank wall staring back, builder beige, maybe a thermostat, definitely nothing worth looking at. It’s the home’s dead zone, where design enthusiasm runs out before the drywall does. But that termination point is prime real estate for adding character, function, or both. Whether it’s a narrow second-floor landing or a long first-floor corridor, the endpoint anchors the view from every room that opens onto it. Treating it like an afterthought means missing an opportunity visible multiple times a day. With the right approach, scaled to the width, depth, and light conditions, homeowners can turn that blank wall into a purposeful focal point without major construction or a decorator’s budget.
Key Takeaways
- End of hallway decor transforms a blank wall into a focal point that’s viewed multiple times daily by directing eye travel and creating visual depth throughout the corridor.
- Accent wall treatments—including bold paint colors, shiplap, board-and-batten, or wallpaper—establish character and set the hallway’s tone without requiring major construction.
- Functional decor solutions like shallow console tables, floating shelves, and pegboards maximize storage and utility while maintaining the required 36-inch minimum walkway clearance.
- Strategic lighting with wall sconces, picture lights, or recessed fixtures is essential to brighten the endpoint and highlight installed artwork or decor.
- Large mirrors (30×40 inches or larger) doubled perceived depth and reflect light, making narrow hallways feel more spacious and open.
- Proportional furniture and accent pieces—such as upholstered chairs, tall planters, or sculptural objects—add personality while remaining scaled to avoid obstructing traffic flow.
Why the End of Your Hallway Deserves Attention
Hallways funnel foot traffic and sightlines. Every trip to the bedroom, bathroom, or linen closet puts that end wall in the viewer’s direct line of vision. Unlike a side wall that gets a passing glance, the terminus gets sustained attention, making it the most viewed surface in the corridor.
From a design standpoint, the end of a hallway is a natural focal point. The eye travels to the farthest visible plane, so leaving it blank creates a visual void. Filling that space with intentional decor draws the eye forward, lengthens the perceived depth, and gives the hallway a finished, cohesive look.
Functionally, it’s also an underused opportunity for storage, display, or utility. Narrow hallways don’t always accommodate furniture along their length, but the endpoint, especially in wider or T-shaped layouts, can handle a console, bench, or shelving unit without impeding traffic flow.
Before choosing a treatment, measure the wall width and note any obstacles: return-air vents, light switches, smoke detectors, or doorways within 18 inches of the corner. These dictate what can physically fit and where anchors can be placed into studs (typically spaced 16 inches on center in most residential framing).
Creating a Focal Point Wall
A bold wall treatment commands attention and sets the hallway’s tone. Paint is the most accessible option: an accent color in a matte or eggshell finish adds depth without the sheen that highlights imperfections common in hallway drywall. Deep jewel tones (navy, emerald, charcoal) work well in naturally lit halls, while lighter, warm neutrals prevent darker corridors from feeling claustrophobic.
For more texture, consider board-and-batten wainscoting or a shiplap feature wall. Both add dimension and can be DIYed with 1×4 or 1×6 pine boards (actual dimensions: 3/4″ x 3.5″ or 3/4″ x 5.5″). Install horizontal shiplap with a nickel-gap spacing using a nickel as a literal spacer, and fasten into studs with 2-inch finish nails and construction adhesive. Board-and-batten runs vertically and traditionally sits on a horizontal rail about 32–36 inches from the floor. Prime and paint before installation to avoid brush marks in tight seams.
Wallpaper offers pattern without construction. Peel-and-stick varieties simplify installation and removal, though traditional paste-backed papers hold up better in high-humidity homes. Measure the wall width and height, then add 4 inches to each dimension for trimming. Start from the center and work outward to keep patterns symmetrical.
Statement Artwork and Gallery Walls
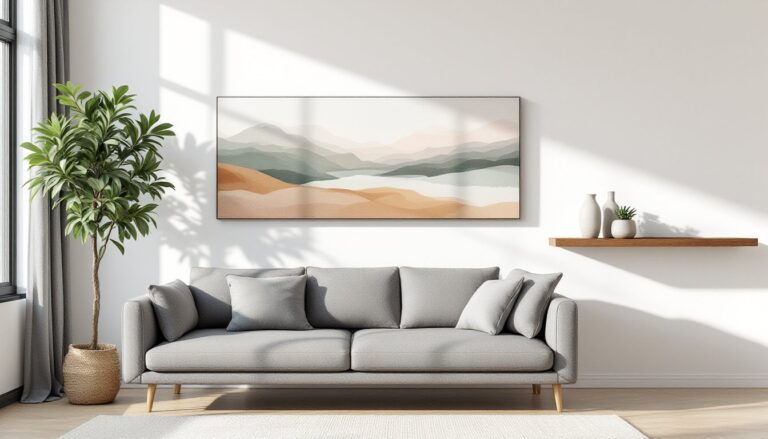
A single large-scale piece, 30×40 inches or larger, anchors the space with minimal hardware. Canvas prints or framed photography work well: avoid glass-front frames in narrow halls where a passerby’s shoulder could knock them loose. Hang artwork so the center sits at 57–60 inches from the floor (standard gallery height), using two D-rings and picture wire on the frame, secured to studs or heavy-duty drywall anchors rated for the frame’s weight.
Gallery walls offer flexibility but require more planning. Lay the arrangement on the floor first, then trace each frame onto kraft paper, tape the paper templates to the wall, and mark nail holes through the paper before removing it. Keep spacing consistent, 2 to 3 inches between frames reads as intentional. Mix frame sizes and orientations (portrait, landscape, square) but stick to one or two frame finishes (all black, all natural wood, or black and white) to maintain coherence. For halls under 42 inches wide, limit gallery walls to vertical arrangements: horizontal spreads eat up space and can feel cluttered.
Functional Decor Solutions for Hallway Endings
Decor doesn’t have to be purely aesthetic. A shallow console table, 12 to 16 inches deep, fits most hallway ends without blocking passage and provides a surface for keys, mail, or a table lamp. Look for models with lower shelves for baskets or bins that corral gloves, pet leashes, or seasonal items.
Floating shelves add vertical storage without a footprint. Install two or three staggered shelves (8–10 inches deep, 24–36 inches wide) using heavy-duty bracket systems that anchor into studs. Display a mix of books, small plants, and decorative objects, but avoid overcrowding, leave 40% of the shelf surface empty to maintain a clean look.
Pegboards or wall-mounted coat racks suit high-traffic households. Install a pegboard panel (1/4-inch tempered hardboard, painted or stained) on 1×2 furring strips to create clearance for peg insertion. Arrange pegs, hooks, and small shelves to hold bags, hats, or umbrellas. This works especially well in homes where incorporating functional wall storage near entry points reduces clutter in adjacent rooms.
In homes with kids or pets, a low bench with cubbies offers seating for shoe removal and compartments for each family member. Ensure the bench depth doesn’t exceed 18 inches if the hallway is under 48 inches wide, preserving a minimum 36-inch walkway clearance per IRC recommendations for accessible routes.
Lighting Strategies to Brighten Dead-End Hallways
Poor lighting is the hallway endpoint’s biggest enemy. Most hallways rely on a single overhead fixture midway down the corridor, leaving the far wall dim or shadowed. Adding a dedicated light source at the endpoint brightens the space and highlights whatever decor is installed there.
Wall sconces flank artwork or mirrors beautifully. Hardwired sconces require running electrical cable inside the wall (a job for a licensed electrician unless the homeowner is comfortable with NEC-compliant wiring and pulling permits). Plug-in sconces offer a no-demo alternative: mount the fixture, run the cord down behind the backplate, and conceal it with paintable cord covers or route it behind furniture.
Install sconces 60–66 inches from the floor to the center of the fixture. If flanking a mirror or piece of art, space them 24–30 inches apart or slightly wider than the frame’s width. Use LED bulbs in the 2700–3000K range (warm white) to avoid the harsh, clinical cast of cooler temps.
Picture lights mount directly above framed art and cast a focused downward glow. Battery-operated LED models eliminate wiring, though they require periodic battery swaps. Hardwired versions integrate cleaner but need an electrical box behind the wall.
Recessed ceiling lights work if there’s attic or crawl space access above. A single canless LED downlight (4-inch aperture) centered over the end wall provides ambient light and pairs well with a dimmer switch for adjustable brightness. Installation involves cutting a hole in the drywall, fishing electrical cable, and connecting to an existing circuit, again, a permit-required task in most jurisdictions.
Natural light, when available, beats any fixture. If the hallway ends near a window or the wall backs onto an exterior side, consider adding a transom window above a doorway or a small, high-mount casement window. Both require framing modifications and possibly a structural header if the wall is load-bearing, so consult a professional before cutting into studs.
Using Mirrors to Expand Visual Space
Mirrors double perceived depth and reflect available light, critical in narrow or windowless hallways. A large mirror (30×40 inches minimum, up to 48×60 inches for wide walls) leaned against the wall or hung centered creates immediate impact.
Frame style matters. Ornate or heavy frames suit traditional homes, while thin metal or frameless mirrors work in contemporary spaces. For a DIY approach, buy a frameless mirror cut to size from a glass shop (typically $3–$5 per square foot), then attach it with mirror clips or adhesive mirror mounting tape rated for the mirror’s weight. Alternatively, build a simple frame from 1×4 boards mitered at the corners, paint or stain it, then secure the mirror inside with glazing points and a bead of clear silicone.
Hang mirrors so the bottom edge is 4–6 inches above any furniture below, or 36–40 inches from the floor if nothing sits beneath. Use two D-rings and braided picture wire on the back, anchored into studs with screws or into drywall with toggle bolts for mirrors over 20 pounds.
For a modern take, try an oversized round mirror. Circles soften the hard angles typical of hallway architecture and pair well with contemporary decor schemes that emphasize clean lines and geometric contrast. Mount it centered on the wall or slightly offset with a sculptural wall sconce on the opposite side for asymmetry.
Avoid placing mirrors directly opposite bright windows or exterior doors, they’ll create glare and lose their depth-enhancing effect. Instead, angle them to reflect artwork, an adjacent room, or any light source that doesn’t shine directly into them.
Furniture and Accent Pieces That Fit
Furniture at a hallway’s end should be proportional and purposeful. A narrow console, ideally 10–14 inches deep, offers display space without obstruction. Place a table lamp, a small tray for mail, or a decorative bowl on top, and use the lower shelf for baskets or a stack of coffee-table books. Secure tall or tippy consoles to the wall with L-brackets to prevent tipping, especially in homes with children or pets.
Accent chairs or small benches suit wider hallways (48 inches or more). A single upholstered chair angled slightly toward the hallway creates a reading nook if paired with a floor lamp and side table. Choose chairs with exposed legs rather than skirted bases, visual space underneath keeps the area feeling open.
Tall planters or plant stands bring life without bulk. A 36- to 48-inch-tall planter with a fiddle-leaf fig, snake plant, or pothos adds vertical interest. If natural light is limited, opt for high-quality faux plants or low-light-tolerant species like pothos or ZZ plants. Ensure the planter has a drainage tray or use a cachepot (decorative outer pot with no drainage) to protect flooring.
Sculptural objects, ceramic vases, wooden bowls, or small statues, add personality. Group items in odd numbers (three or five) on a console or shelf, varying heights and textures for visual interest. This approach often appears in budget-friendly makeover projects where repositioning existing decor yields high impact at zero cost.
Ladders or blanket racks offer casual storage. A decorative wooden ladder (painted or stained) leans against the wall and holds throws, quilts, or even hanging plants on S-hooks. Keep the ladder’s footprint narrow, no more than 20 inches at the base, and anchor the top with a small L-bracket to prevent sliding.
Whatever furniture is chosen, leave at least 36 inches of clear width in the hallway itself. Measure from the furniture’s front edge to the opposite wall to confirm compliance with basic accessibility and fire egress standards.