Table of Contents
ToggleAngel wings have migrated from ceilings of cathedrals to living room walls, and for good reason. These statement pieces bring vertical drama, textural depth, and a touch of elegance that works in everything from farmhouse kitchens to modern lofts. Unlike generic wall art that sits flat, wings project outward, casting shadows, catching light, and filling space in ways that paint and prints can’t match. Whether you’re drawn to the industrial edge of metal feathers or the warmth of reclaimed wood, angel wings offer a sculptural focal point that transforms blank walls into conversation starters.
Key Takeaways
- Angel wings wall decor creates dimensional impact by projecting 6-12 inches off the wall, instantly transforming blank walls into eye-catching focal points that compete with multi-piece art installations.
- Metal, wood, and feathered angel wings each offer distinct advantages—steel for outdoor durability, rustic wood for farmhouse aesthetics, and fabric feathers for softness in bedrooms and nurseries.
- Proper placement above beds, entryways, and accent walls requires mounting into studs or heavy-duty anchors, with height consideration (6-12 inches above mattress for beds, 60-72 inches for dining areas) preventing visual mishaps.
- Building DIY angel wings takes only 6-8 hours and costs $40-70, requiring intermediate carpentry skills and yielding custom-sized pieces that match your room’s exact color scheme.
- Wood preparation is critical—acclimate boards to room humidity for 48 hours before cutting and apply layered feathers (minimum three depth levels) to avoid flat, unconvincing results.
- Avoid placing angel wings near heat sources or direct sunlight, as wood can crack from temperature cycling and UV exposure fades paint and natural materials over time.
What Makes Angel Wings Wall Decor So Popular?
Angel wings deliver what designers call “dimensional impact.” Instead of adding another flat canvas, homeowners install something that reaches 6-12 inches off the wall, creating the kind of visual interest that changes a room’s entire feel.
The symbolism doesn’t hurt, either. Wings represent protection, freedom, and aspiration, themes that resonate whether someone’s religious or simply likes the metaphor. That universal appeal makes them appropriate for bedrooms, entryways, nurseries, and even home offices.
From a practical standpoint, wings fill vertical space efficiently. A 36-inch wingspan covers the same wall area as four or five framed prints but requires only two mounting points. For homeowners working with high ceilings or oversized walls, that efficiency matters.
The trend also benefits from material diversity. Metal wings fit industrial and contemporary spaces. Distressed wood versions anchor farmhouse and shabby chic rooms. Feathered designs soften minimalist interiors. This adaptability keeps the concept fresh across different design movements and personal tastes.
Types of Angel Wings Wall Decor for Every Style
Metal and Wrought Iron Angel Wings
Metal wings range from laser-cut steel with intricate feather patterns to hand-forged wrought iron with a blacksmith’s hammer marks still visible. Steel construction typically handles outdoor mounting better than wood, making these suitable for covered porches or garden walls where moisture would warp other materials.
Look for powder-coated finishes if you’re mounting near humidity sources (bathrooms, kitchens). Raw steel develops a rust patina over time, intentional in some industrial designs, but problematic if you’re aiming for clean lines. Aluminum versions weigh less (important for drywall anchoring) but dent more easily during shipping and installation.
Wall thickness matters here. Metal wings often ship with basic D-ring hangers that work for single-stud mounting, but wings over 30 inches wide need toggle bolts or mounting plates that distribute weight across multiple studs. Expect metal pieces in the 24-48 inch range to weigh 8-15 pounds.
Wooden and Rustic Wing Designs
Wood wings leverage natural grain and texture in ways metal can’t replicate. Common builds include individual feathers cut from 1×4 or 1×6 pine boards, layered and staggered to create depth, then mounted to a plywood backer.
Reclaimed barn wood and pallet wood show up frequently in rustic designs, but verify the wood’s been kiln-dried and treated for insects before bringing it indoors. Untreated reclaimed lumber can introduce powder post beetles or carpenter ants, a problem that starts in the wall decor and spreads to framing.
MDF (medium-density fiberboard) offers a budget alternative. It routes cleanly for intricate feather detail and takes paint well, but it’s heavier than solid wood at equivalent dimensions and will swell if it gets wet. For painted finishes where grain doesn’t matter, MDF works fine. For stained or natural looks, stick with solid wood.
Many popular room transformations incorporate wooden wings above beds or mantels, using the texture contrast to anchor softer elements like bedding or upholstered furniture.
Feather and Fabric Angel Wings
Fabric wings use real or synthetic feathers attached to wire armatures, creating the most literal interpretation of angel wings. These tend to be lighter (3-6 pounds for a 36-inch span) and easier to hang, but they’re also dust magnets and difficult to clean.
Goose and turkey feathers provide the most realistic look but require occasional maintenance, a light dusting with a microfiber cloth or a low-power vacuum with a brush attachment. Synthetic feathers (usually polyester) resist dust better and cost less, but they lack the subtle color variation of natural materials.
Construction quality varies wildly. Better designs attach each feather to a galvanized wire frame that holds its shape. Cheaper versions glue feathers to foam board that can warp or crack. Check how the piece is backed before purchasing, you want something rigid enough to maintain the wing curve during hanging.
These work particularly well in bedrooms and nurseries where softness is part of the design intent. They’re less suitable for high-traffic areas where feathers might get bumped or pulled.
Where to Display Angel Wings in Your Home
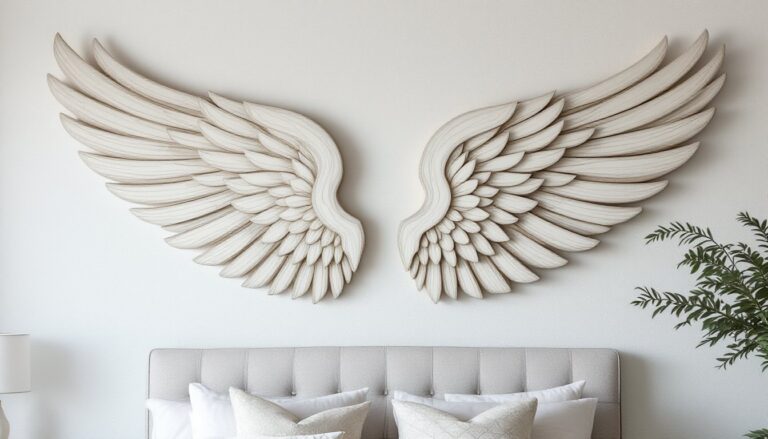
Above the bed remains the most common placement, functioning as an oversized headboard alternative. For standard queen beds (60 inches wide), wings in the 40-50 inch range maintain visual proportion. Mount the center point 6-12 inches above mattress height so the wings don’t disappear behind pillows.
Entryways and foyers benefit from the vertical drama wings provide, especially in homes with two-story entries. A 48-60 inch wingspan fills the space without overwhelming it. Ensure you’re mounting into studs or using appropriate anchors, drywall alone won’t support larger pieces in high-ceiling applications.
Dining room accent walls work when the wings complement rather than compete with the table. Mount them high enough (60-72 inches to the bottom edge) that seated guests aren’t staring directly into feather tips. The goal is to draw the eye upward and add architectural interest to what’s often a plain wall.
Nurseries and kids’ rooms lean heavily on the protective symbolism. Smaller wings (24-36 inches) scale better for these spaces. Verify mounting security carefully here, anything that could potentially fall should be anchored with heavy-duty wall anchors rated for at least three times the decor’s weight.
Avoid placing wings directly above heat sources (fireplaces, radiators, baseboard heaters). Wood can crack from repeated temperature cycling, and fabric feathers can yellow or become brittle. Also skip locations where the wings will be in direct afternoon sunlight, UV exposure fades paint and natural materials over time.
Many DIY makeover projects use wings as the anchor piece that determines the room’s entire color scheme and decorative direction, building outward from the wing finish and style.
DIY Angel Wings: How to Create Your Own Wall Decor
Building custom wings gives you control over size, finish, and cost, and the project requires only intermediate carpentry skills.
Materials for a 40-inch wooden wing set:
• One 1/2-inch plywood sheet (24×48 inches) for the backer
• Eight 1×4 pine or poplar boards (6 feet long) for feathers
• Wood glue (Titebond II or III)
• 1-1/4 inch brad nails or finish nails
• Sandpaper (80, 120, and 220 grit)
• Primer and paint or stain
• Two D-ring hangers (rated for 15+ pounds each)
• Safety equipment: dust mask, safety glasses, hearing protection
Tools needed:
• Jigsaw or band saw for cutting wing shape and feather profiles
• Miter saw (a circular saw works but gives rougher cuts on angled feather tips)
• Drill with bits for pilot holes
• Brad nailer (optional but speeds assembly: hammer and finish nails work fine)
• Orbital sander (hand-sanding works for small projects)
Step-by-step construction:
-
Draw the wing template. Sketch one wing shape on the plywood, roughly 20 inches tall by 18 inches wide, with a curved outer edge. Cut it out with a jigsaw, then trace and cut the mirror image for the second wing.
-
Cut individual feathers. Rip the 1×4 boards into strips 2-3 inches wide, varying the widths for visual interest. Cut one end of each strip at a 30-45 degree angle to create the feather tip. You’ll need 12-15 feathers per wing.
-
Sand everything. Start with 80-grit to remove saw marks, progress through 120-grit, and finish with 220-grit. Skip this step and every imperfection will show under paint.
-
Arrange and attach feathers. Lay feathers on the plywood backer, overlapping like shingles and starting from the bottom edge. Apply wood glue to the back of each feather and secure with brad nails. Work upward, letting each row overlap the previous by 1-2 inches.
-
Prime and finish. Apply one coat of primer (essential for even paint coverage, especially on pine which absorbs stain unevenly). Sand lightly with 220-grit after the primer dries. Apply two coats of paint or stain, sanding between coats.
-
Install hanging hardware. Attach D-rings to the back of each wing, positioning them one-third down from the top edge. This placement keeps the wings from tilting forward when mounted.
Mounting the wings:
Use a stud finder to locate wall studs. For wings over 20 inches, mount into at least one stud per wing. If studs don’t align with your desired placement, use toggle bolts or molly bolts rated for the wing’s weight plus 50%.
Mark your mounting points with a level, crooked wings ruin the effect. Drill pilot holes slightly smaller than your screw diameter to prevent drywall cracking.
Finishing alternatives: Many builders skip solid paint in favor of a dry-brush technique, applying a base coat (often white or cream) then lightly dragging a contrasting color (gray, gold, or bronze) across feather edges for dimension. Others use a wash or glaze to settle pigment into wood grain while leaving high points lighter.
For those wanting more detailed guidance on feather layering techniques, crafting tutorials cover various approaches to achieving realistic feather texture with basic carpentry tools.
Common mistakes to avoid:
• Skipping wood acclimation. Store boards in the room where you’ll hang the wings for 48 hours before cutting, this lets the wood adjust to humidity levels and reduces warping after installation.
• Using too few feather layers. Single-layer wings look flat. Aim for at least three depth levels (background, middle, and foreground feathers) to create shadow and dimension.
• Over-tightening mounting screws. Drywall anchors can pull through if torqued too hard. Snug is enough, you’re not building a deck.
The entire project typically takes 6-8 hours spread across a weekend (allowing for glue and finish drying time), and material costs run $40-70 depending on wood selection and finish quality.