Table of Contents
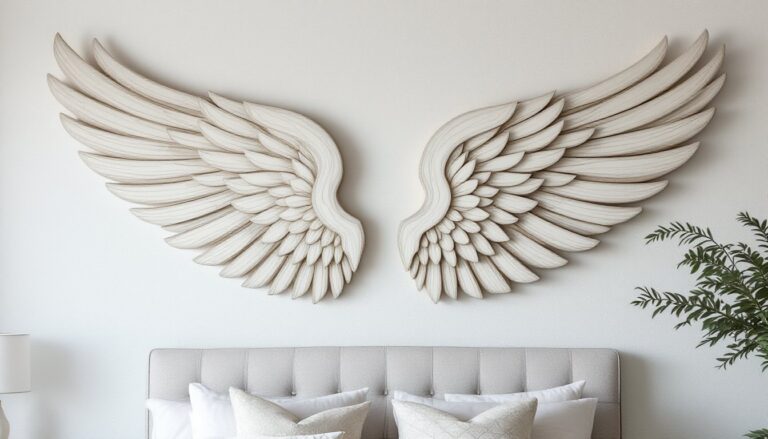
ToggleThree-dimensional butterfly wall decor brings instant movement and visual interest to flat walls without permanent commitment or major expense. Unlike traditional framed art, these layered installations create shadows and depth that shift throughout the day as light changes. They’re particularly effective in spaces that feel sterile or lack architectural detail, nurseries, bedrooms, entryways, and accent walls all benefit from the organic geometry butterflies provide. The installation requires minimal tools, no drywall repair skills, and can be completed in an afternoon. Whether working with paper, metal, or acrylic materials, the project scales easily from a small cluster to a dramatic full-wall migration pattern.
Key Takeaways
- 3D butterfly wall decor creates visual depth and movement through shadows without permanent commitment, making it ideal for renters and spaces lacking architectural detail.
- Choose materials based on durability needs: paper for budget-friendly low-traffic areas, metal for bold modern statements, and acrylic for moisture-resistant versatility.
- Proper installation starts with floor planning, wall preparation, and center-outward placement, with full adhesive curing taking 24 hours for lasting results.
- Gradient, migration, or corner burst patterns transform 3D butterfly wall decor into intentional design features that enhance room perception and draw the eye strategically.
- Maintenance requires gentle dusting every 2-4 weeks and quarterly inspections to keep your butterfly installation vibrant and secure for years of impact.
Why 3D Butterfly Wall Decor Is Perfect for Modern Homes
Modern interiors often prioritize clean lines and neutral palettes, which can read as cold without textural or dimensional elements. Butterfly wall art addresses this by adding organic shapes that soften hard edges while maintaining the streamlined aesthetic most contemporary spaces require.
The three-dimensional aspect creates visual depth without adding bulk. Each butterfly sits slightly off the wall, typically ¼ inch to 1 inch, using foam mounting squares, wire stems, or adhesive tabs. This gap allows natural and artificial light to cast subtle shadows, making the installation feel alive rather than static.
Unlike wallpaper or paint, butterfly installations are fully reversible. Most adhesive methods (foam dots, removable adhesive strips, or museum putty) leave minimal residue and won’t damage paint or drywall when removed properly. This makes them ideal for renters or anyone hesitant about permanent wall treatments.
The project also offers unusual flexibility in scale and density. A dozen butterflies clustered in one corner creates a delicate accent, while several hundred arranged in a gradient or swarm pattern becomes a statement feature wall. The same materials and techniques apply regardless of scope, so homeowners can start small and expand as confidence builds.
From a practical standpoint, butterfly decor conceals minor wall imperfections, nail holes, discolored patches, or textural inconsistencies, without requiring repair work. The scattered, organic arrangement naturally draws the eye away from flaws.
Choosing the Right Materials for Your Butterfly Wall Art
Material choice determines durability, visual effect, installation method, and total project cost. Each option has specific advantages depending on the room’s function and aesthetic goals.
Paper vs. Metal vs. Acrylic: What Works Best
Paper butterflies are the most accessible option for first-time installers. Cardstock (65–110 lb) holds crisp folds and costs $0.05–$0.15 per butterfly when cut at home using templates or a cutting machine like a Cricut. Pre-cut sets run $8–$25 for 50–100 pieces. Paper works well in low-traffic areas, bedrooms, offices, or above furniture, but won’t hold up in humid bathrooms or high-touch zones near doorways. The material accepts paint, ink, or decorative paper patterns, making color customization straightforward. But, paper fades under direct sunlight and can curl in humid climates unless sealed with a clear acrylic spray.
Metal butterflies (typically laser-cut steel or aluminum) offer long-term durability and a modern, sculptural look. Expect to pay $1.50–$5 per piece depending on size (2–6 inches) and finish. Powder-coated or painted finishes resist rust and maintain color stability in bathrooms or kitchens. The material’s weight requires stronger adhesive, heavy-duty foam mounting tape rated for 1–3 lbs or small finishing nails if wall damage isn’t a concern. Metal reflects light differently than paper, creating sharper, more defined shadows that emphasize the three-dimensional effect. Some DIYers appreciate the industrial edge: others find metal too heavy-handed for softer decor styles. Many experienced decorators using budget renovation ideas recommend metal for high-impact accent walls.
Acrylic butterflies split the difference. Lightweight like paper but moisture-resistant and semi-permanent like metal, acrylic costs $0.75–$3 per piece. Laser-cut acrylic comes in transparent, frosted, or opaque finishes, with or without mirrored backing. The transparent options layer beautifully, allowing wall color to show through while still creating dimension. Acrylic installs easily with foam mounting dots (same as paper) and won’t yellow or warp in most indoor conditions. The primary limitation is color range, acrylic doesn’t accept paint well, so customization relies on purchasing pre-colored sheets or using vinyl decals on the surface.
For mixed-material installations, use larger metal or acrylic butterflies as anchors with smaller paper ones filling in the pattern. This reduces cost while maintaining visual impact.
Step-by-Step Guide to Installing 3D Butterfly Wall Decor
Proper installation determines how professional the finished project looks and how long it lasts. The process remains consistent across materials, with minor adjustments for weight and adhesive type.
1. Plan the layout on the floor first. Arrange butterflies on a drop cloth or clean floor space in the exact pattern intended for the wall. Take a photo from above for reference. This step prevents adhesive waste and reduces wall damage from repositioning. For gradient or ombré effects, sort butterflies by color or size beforehand.
2. Mark the wall boundary. Use painter’s tape to outline the installation area, this keeps the design contained and prevents creep beyond the intended space. Measure and mark the vertical and horizontal center points with a pencil if working with a symmetrical pattern.
3. Clean the wall surface. Wipe the installation area with a damp cloth to remove dust, then dry completely. Adhesive bonds poorly to dusty or greasy surfaces, especially in kitchens. For textured walls (orange peel or knockdown texture), flatten high points slightly with fine-grit sandpaper where each butterfly will sit, this increases adhesive contact area.
4. Attach mounting adhesive. For paper and acrylic butterflies, use foam mounting squares (⅛ inch thick) or adhesive dots. Apply one square to the butterfly’s body center, leaving wings free to create dimension. For metal pieces, use heavy-duty foam mounting tape (½ inch wide) rated for the weight, or pre-drill pilot holes and use ⅝-inch wire nails if the wall can tolerate penetration. Most DIY decor projects rely on removable adhesive to avoid permanent damage.
5. Install from the center outward. Place the first butterfly at the center point (or focal point if using an asymmetric design), then work outward in concentric rings or along the planned pattern. Press each piece firmly for 10–15 seconds to ensure full adhesive contact. Step back every 10–15 butterflies to check spacing and alignment.
6. Adjust wing angles. Once installed, gently bend wings upward at varied angles (20–60 degrees from the wall) using fingers or a ruler edge. Varying the angles across the installation creates a more dynamic, naturalistic effect than uniform positioning. Be cautious with paper, overbending causes creases.
7. Let the adhesive cure. Most foam adhesives reach full bond strength after 24 hours. Avoid bumping or adjusting the installation during this period. If a butterfly falls, clean the old adhesive completely before reapplying.
Tools needed: tape measure, painter’s tape, level (optional for straight-line patterns), clean cloth, scissors or utility knife (for trimming adhesive).
Safety note: When installing above furniture or beds, ensure adhesive is rated for the butterfly’s weight to prevent pieces from falling. For ceiling installations, use stronger mechanical fasteners rather than relying solely on adhesive.
Creative Design Ideas and Placement Tips
Placement and pattern make the difference between a scattered craft project and an intentional design feature. Consider the room’s architecture, furniture layout, and sightlines when planning.
Gradient and ombré patterns work well on large accent walls. Start with dark or saturated colors at one corner (usually bottom left or top right) and transition through mid-tones to light or white at the opposite corner. Use 50–150 butterflies depending on wall size. This approach draws the eye diagonally across the space, making rooms feel larger.
Migration or swarm patterns mimic natural butterfly movement. Concentrate dense clusters in one area, then scatter individual butterflies trailing off in one or two directions. This creates a sense of motion and works especially well flanking windows, flowing around door frames, or sweeping across a stairway wall.
Framed clusters suit smaller spaces or renters hesitant about covering large wall sections. Arrange 15–30 butterflies within an invisible 24×36-inch or 36×48-inch rectangle, leaving the perimeter clean. This contains the installation like traditional framed art while maintaining the dimensional effect.
Corner bursts use often-ignored upper wall corners. Stack butterflies in a triangular pattern radiating from the corner outward and downward. This draws attention upward, increasing perceived ceiling height in rooms with standard 8-foot ceilings.
Color Schemes and Patterns That Make an Impact
Color choice amplifies or undermines the installation’s effectiveness. Monochromatic schemes (all white, all metallics, or graduated shades of one color) create sophisticated, cohesive looks that don’t compete with existing decor. This approach suits minimalist or Scandinavian interiors.
Analogous color schemes, colors adjacent on the color wheel, like blues through greens or reds through oranges, offer visual interest without clash. These work well in eclectic or bohemian spaces where layered color is already present.
High-contrast combinations (black on white walls, metallics on dark paint, or bright primaries on neutrals) make bold statements. Use these in kids’ rooms, creative studios, or feature walls where the butterflies are the room’s primary focal point. Techniques found in home crafting projects often emphasize contrast for maximum impact.
For wall color considerations: butterflies show best against matte or eggshell paint finishes. High-gloss paint reflects light unevenly, reducing shadow definition. If the wall color and butterfly color are too similar, add a thin contrasting outline (paint pen or marker on paper, vinyl edge on acrylic) to create separation.
Avoid placing butterflies where they’ll be backlit (directly opposite windows or light fixtures) unless using transparent acrylic designed for that effect. Backlighting flattens the three-dimensional shadows that make the installation work.
Maintaining and Caring for Your Butterfly Wall Display
Unlike art behind glass, three-dimensional wall decor accumulates dust and requires occasional attention to maintain its appearance.
Dust removal: Use a handheld duster with soft microfiber or a vacuum with a brush attachment on low suction. Work gently from the center of each butterfly outward to avoid catching and tearing wings. Frequency depends on household conditions, every 2–4 weeks in typical homes, weekly in dusty climates or homes with pets. Never use compressed air: the force can dislodge adhesive or damage delicate wings.
Spot cleaning: For paper butterflies with fingerprints or smudges, use a clean, dry microfiber cloth with very light pressure. If the paper is sealed with acrylic spray, a barely damp cloth works, but test on a spare butterfly first. Metal and acrylic tolerate damp cleaning better, use water with a drop of dish soap, wring the cloth nearly dry, and wipe gently. Dry immediately to prevent water spots.
Reattaching loose pieces: If butterflies fall due to adhesive failure, remove old adhesive completely with a plastic scraper or your fingernail (not metal, which scratches walls). Clean both surfaces with rubbing alcohol, let dry, then apply fresh mounting adhesive. Keep spare adhesive squares on hand for quick repairs.
Preventing fading: Paper installations fade under UV exposure. If butterflies are near windows, apply UV-blocking window film or rotate the installation seasonally, replacing faded pieces as needed. Metal and acrylic resist fading better but can still lose vibrancy in intense, direct sunlight over years.
Long-term storage: If removing the installation, store butterflies flat between sheets of acid-free tissue paper in a rigid container. Don’t stack heavy items on top, crushed wings don’t regain their shape. Label the container with the color scheme and quantity for easier reinstallation.
Inspect the installation quarterly, tightening any loose adhesive and adjusting wing angles that have flattened. With minimal upkeep, a well-installed butterfly wall can maintain its impact for several years before requiring replacement.